

Our last Blog featuring Seppo Salminen from TRS Custom Drums garnered a lot of interest in his custom work. We periodically take gear down to Newmarket for repair and refurbishing. If interested, please contact Bang On Drum Shop at 519-580-1554 to arrange drop off.
Just reminder that Drums for Kids continues to steam forward. Building or refurbishing drum kits for deserving kids throughout Ontario. Any gently used equipment can be dropped off to our location on Victoria Street and we will get it to the team restoring and distributing.
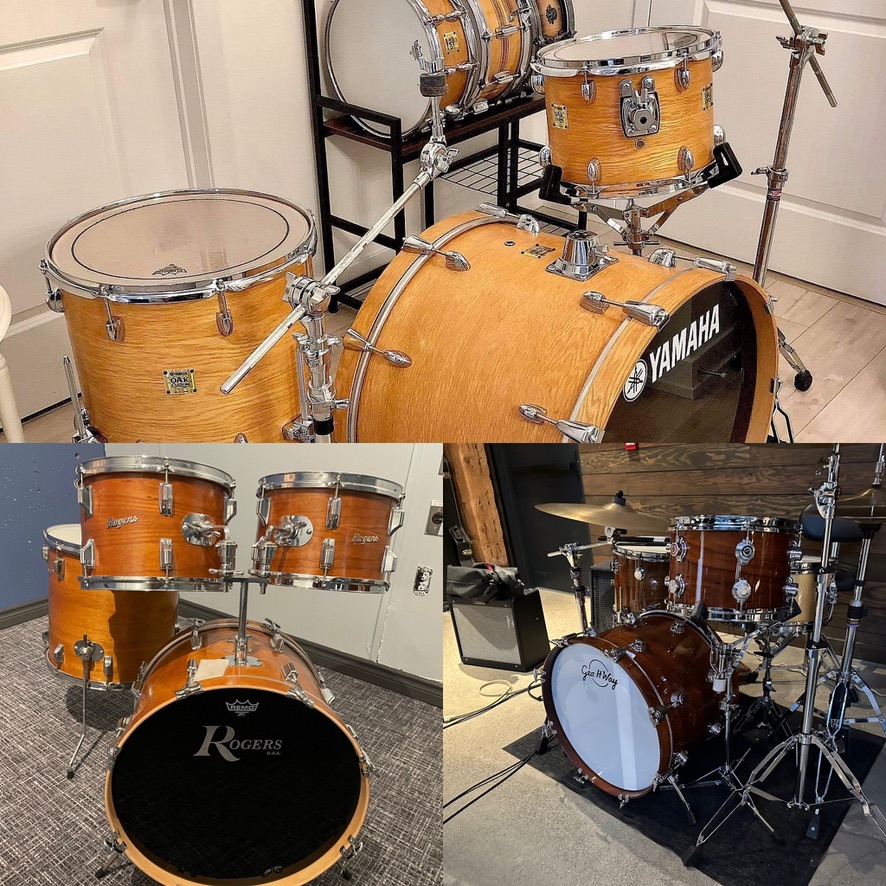
This month we are featuring our Hand Made George Way Acacia Aristocrat Kit, made in Vancouver by Ronn Dunnett of Dunnett drums. This beautiful kit features;
Shells are made from 4 plies with 4 ply reinforcement rings.
- FOUR PLY ELECTRONIC BONDED REINFORCED SHELL & EDGE RINGS
- G WAY DOUBLE EDGE-DOUBLE FLANGE HOOPS
- DIE CAST BASS DRUM CLAWS WITH T HANDLES
- REMO COATED AMBASSADOR HEADS
- DOUBLE END STREAMLINE CASINGS
- WAYBEST ARCH SPURS
- AAA CHROME PLATING ON ALL METAL PARTS
- CAMCO/DW TURRET LUGS
Rack Tom: 8×12
Floor Tom: 14×14
Bass Drum: 14×20
George Way 14×7 way Gold Gloss sheen Snare $3,675 plus tax for all 4 shells.
Listen to the drums in action here>>>>>


This month we want to follow up on a subject that has been of great interest among many of you. Drum Tuning and the ongoing battle getting a good sound out of larger drums 14” diameter or larger. Something that shows up particularly when using microphones live or recording.
Tuning Your Drums
STEP 1
Start from scratch. If you’ve already got the drumhead on, completely detune it by loosening all of the lugs. You’ll have much better results if you start out this way. Clear out any dust/drumstick fragments/other stuff if you take the drumhead completely off!
STEP 2
You’ll tune the batter (top) drumhead first (the drumhead that you hit). Stop the resonant head from interfering by resting it on the drum stool or something to keep the resonant head from vibrating.
If you’re tuning the resonant (bottom) drumhead, the same steps apply. Remember to stop the batter side from interfering by resting your drum upside-down on the drum stool. For tuning a resonant snare drum, throw off your snare wires and put your drum stick between the wires and the hoop to keep them from touching the resonant head.
STEP 3
Seat the drumhead. Press in the center and around the edge to ensure the head fits snug against the bearing edge. Without the drumhead making good bearing edge contact, it will be hard (or impossible) to tune. Don’t worry if the head makes cracking noises, this is normal!
STEP 4
If you’ve removed the drumhead completely, put on the hoop and insert the tuning rods into each lug.
STEP 5
Finger-tighten each tuning rod (screw it as tight as you can with only your fingers). Double-check the ones you’ve already done (they can usually be tightened more)… This ensures each rod starts with the same amount of tension. Even tension around the drumhead is the key to good drum tuning!
STEP 6
Tighten each rod a 1/4 turn with a drum key. Following the pattern in the diagram below, always tighten the opposite rod from the one you’ve just turned… Never tighten two rods side-by-side (unless you’re looking for a specific sound).
Your drum might have a different number of rods (the one in the diagram below has 10). Don’t worry! Just remember to always move to the opposite side of the drum as you’re tightening each rod.
Listen to the drum as you’re tuning it. Each time you’ve turned all of the rods, check how it sounds.
STEP 7
Continue to tighten each rod. 1/2 turns if you’re still far from your desired sound, otherwise 1/4 or 1/8 turns as you get closer to the pitch you want.
Experiment – if you’re unsure of what sound you want, listen to what your drum can do.
Find out how your drums sound at low, medium and high tuning.
STEP 8
Check the pitch of each rod once you’re close to the sound you want. Dampen the center of the drumhead with your finger and lightly tap the head a few inches in from each rod (with the drum key). You’ll probably notice some of them will be higher/lower in pitch. Mismatched rod tunings will give strange overtones:
- Make small tuning adjustments to even the pitch of all rods (and if there’s one pitch you prefer, tune the rest of the rods match).
- When making small changes like this, you’ll usually need to tune the opposite rod the same amount: Usually two opposite rods will share the same pitch (the drumhead is stretched equally between them).
- This part can be difficult and takes time to master. I
- Check your sound! Once the pitch is even around the drumhead, check the sound by giving the drum a good hit. Humming the desired note into the batter head and resonant head is also a simple trick. The head will natural vibrate at the same frequency.
- If you like it, you’re done!
If your drum is too high or low in pitch, simply tighten or loosen each rod… Remember to turn each rod by exactly the same amount.
Each drum has a sweet spot where it will sound the best. If things sound way off, you may be too far above or below the drum’s tuning range. Don’t be afraid to experiment here, each drum is different and it can take a little time to find exactly where it sings.
Repeat these steps for tuning the resonant head!
When tuning the resonant drumhead, you have three options:
- Tune the resonant head the exact same pitch as the batter head. This gives the most sustain (ringing), which is great for really full sounding toms.
- Tune the resonant head higher pitch than the batter head. This gives a shorter sustain, and makes the pitch of the drum bend after each hit.
- Tune the resonant head lower pitch than the batter head. This gives a shorter sustain, and also makes the pitch of the drum bend after each hit. On larger drums, the pitch bend here can be more noticeable.
Watch our YouTube channel for an Instructional Video showing the replacement of both a resonant and batter head COMING SOON.

Don’t forget, Bang On Custom and Vintage Drums also offers Backline and Studio Rentals. Give us a call at 519-580-1554 or email sales@bangondrums.com for rates and availability.


